(html在线预览cad模型)网页三维cad中创建一个装配体 | f2e 前端技术论坛-380玩彩网官网入口
前言
在网页cad中有些相同的零件可以只建一个模型实例,其余用到的地方均为实例的引用,然后将引用组合起来形成装配体。mxcad3d提供了丰富的三维建模功能和便捷的api,接下来聊一下如何利用mxcad3d来创建小车装配体模型。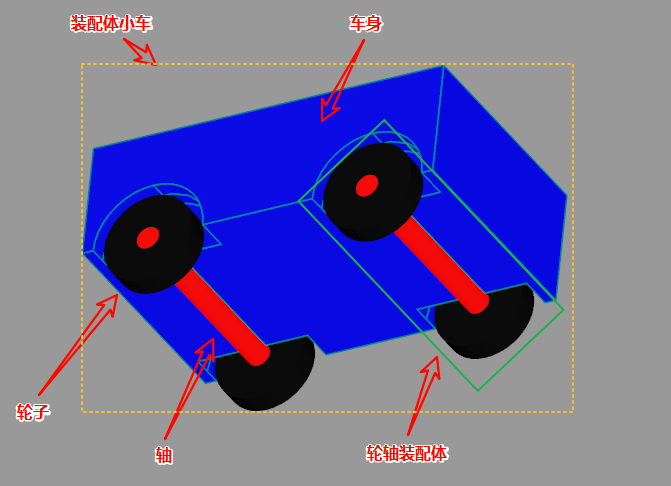
快速入门
首先我们需要学习mxcad的基本使用方法,可以通过官方的入门教程来搭建一个最基本的项目模板。
开发环境准备(对前端开发不熟悉的一定要看),然后创建最基本的、。
本次教程最后完成的完整测试 ,压缩包下载解压后需要在项目目录下打开cmd命令行,然后在命令行中执行npm install来安装依赖,然后再按照本教程中的方式来运行项目查看效果。
编写创建装配体小车的代码
1.按照上面前言中第2条中的方式,根据官方快速入门教程来创建一个名为test3dassemblycar的项目,如下图:
2.编写绘制装配体小车的代码
在index.html中插入一个按钮”绘制装配体小车”, index.html的完整代码如下:
<html lang="en">
<head>
    <meta charset="utf-8">
    <meta http-equiv="x-ua-compatible" content="ie=edge">
    <meta name="viewport" content="width=device-width, initial-scale=1.0">
    <title>vite use mxcadtitle>
head>
<body>
    <div style="height: 800px; overflow: hidden;"> <canvas id="mycanvas">canvas>div>
    <button>绘制装配体小车button>
    <script type="module" src="./src/index.ts">script>
body>
html>
在src/index.ts中编写绘制装配体小车的函数,src/index.ts的完整代码如下:
import { mdge, mx3dgeaxis, mx3dgecolor, mx3dgecsysr, mx3dgedir, mx3dgelocation, mx3dgepoint, mx3dgetrsf, mx3dgevec, mx3dmkcylinder, mx3dmkface, mx3dmkpolygon, mx3dmkprism, mxcad3dobject } from "mxcad"\
// 创建mxcad3d对象\
const mxcad3d = new mxcad3dobject()\
// 初始化mxcad3d对象\
mxcad3d.create({\
    // canvas元素的css选择器字符串(示例中是id选择器),或canvas元素对象\
    canvas: "#mycanvas",\
    // 获取加载wasm相关文件(wasm/js/worker.js)路径位置\
    locatefile: (filename)=> new .href,\
})\
// 初始化完成\
mxcad3d.on("init", ()=>{\
    console.log("初始化完成");\
});\
function drawassemblycar() {\
  // 轮子形状\
  const pt = new mx3dgepoint(0, 0, 0);  // 中心点\
  const dir = new mx3dgedir(0, 0, 1); // 方向\
  const csysr = new mx3dgecsysr(pt, dir); // 根据点和方向创建一个右手坐标系\
  const wheel = new mx3dmkcylinder(csysr, 20, 10);  // 轮子(宽扁的圆柱体)\
  let wheelshape = wheel.shape(); // 获取轮子拓扑形状\
  // 轴形状\
  const axle = new mx3dmkcylinder(csysr, 5, 100); // 轴(细长的圆柱体)\
  const axleshape = axle.shape(); // 获取轴拓扑形状\
  wheelshape = wheelshape.cut(axleshape); // 切割掉轮子的轴孔\
  // 车体形状\
  const bodypts:mx3dgepoint\[] = \[]\
  bodypts.push(new mx3dgepoint(0, 0, 0));\
  bodypts.push(new mx3dgepoint(0, 50, 0));\
  bodypts.push(new mx3dgepoint(160, 50, 0));\
  bodypts.push(new mx3dgepoint(160, 0, 0));\
  const bodypoly = new mx3dmkpolygon(); // 创建多段线(车体的截面轮廓)\
  bodypts.foreach((pt) => {\
    bodypoly.add(pt);\
  });\
  bodypoly.close(); // 闭合多段线\
  const bodywire = bodypoly.wire(); // 获取多段线(车体的截面轮廓)的拓扑wire\
  const bodymkface = new mx3dmkface(bodywire); // 用wire生成面\
  const bodyface = bodymkface.face(); // 获取面\
  const bodyprism = new mx3dmkprism(bodyface, new mx3dgevec(0, 0, 100)); // 用面生成车体实体\
  let bodyshape = bodyprism.shape(); // 获取车体实体形状\
  bodyshape.translateby2points(new mx3dgepoint(30, 0, 0), new mx3dgepoint(0, 0, 0)); // 移动到合适位置,方便装配\
  const wheelforcut = new mx3dmkcylinder(csysr, 25, 15); // 车体嵌入车轮的地方,用车体切掉,用于放入轮子\
  // 以下是切出四个放轮子的空间\
  const wheelforcutshape = wheelforcut.shape();\
  bodyshape = bodyshape.cut(wheelforcutshape);\
  bodyshape = bodyshape.cut(wheelforcutshape.translatedbyvec(new mx3dgevec(0, 0, 85)));\
  bodyshape = bodyshape.cut(wheelforcutshape.translatedbyvec(new mx3dgevec(100, 0, 0)));\
  bodyshape = bodyshape.cut(wheelforcutshape.translatedbyvec(new mx3dgevec(100, 0, 85)));\
  const axleforcut = new mx3dmkcylinder(csysr, 6, 100); // 车体嵌入轴的地方,用车体切掉,用于放入轴\
  // 以下是切出两个放轴的空间\
  const axleforcutshape = axleforcut.shape();\
  bodyshape = bodyshape.cut(axleforcutshape);\
  bodyshape = bodyshape.cut(axleforcutshape.translatedbyvec(new mx3dgevec(100, 0, 0)));\
  // 获取文档\
  const doc = mxcad3d.getdocument();\
  // 车子装配体标签\
  const carlabel = doc.addshapelabel();\
  // 轮子实例标签\
  const wheellabel = doc.addshapelabel();\
  // 车轴实例标签\
  const axlelabel = doc.addshapelabel();\
  // 轮轴装配体实例标签\
  const wheelaxlelabel = doc.addshapelabel();\
  // 车壳实例标签\
  const bodylabel = doc.addshapelabel();\
  // 轮子、轴、车体形状都添加到模型文档的标签中(同时为不同的形状设置不同的颜色)\
  wheellabel.setshape(wheelshape);\
  wheellabel.setcolor(new mx3dgecolor(mdge.mxnameofcolor.color\_noc\_black));\
  axlelabel.setshape(axleshape);\
  axlelabel.setcolor(new mx3dgecolor(mdge.mxnameofcolor.color\_noc\_red));\
  bodylabel.setshape(bodyshape);\
  bodylabel.setcolor(new mx3dgecolor(mdge.mxnameofcolor.color\_noc\_blue2));\
  // 轮轴装配体(轮轴装配体需要两个轮子、一个轴)\
  wheelaxlelabel.addcomponent(wheellabel, new mx3dgelocation()); // 添加第一个轮子,没有位置(原位置,轮子模型创建的位置)\
  const wheel\_2\_trsf = new mx3dgetrsf();\
  wheel\_2\_trsf.settranslationpart(new mx3dgevec(0, 0, 90));\
  wheelaxlelabel.addcomponent(wheellabel, new mx3dgelocation(wheel\_2\_trsf)); // 添加第二个轮子,有位置(向z轴正方向移动90之后的位置)\
  wheelaxlelabel.addcomponent(axlelabel, new mx3dgelocation()); // 添加轴,没有位置(原位置,轴模型创建的位置)\
  // 车子装配体(车子装配体需要两个轮轴装配体、一个车体)\
  const wheelaxle\_1\_trsf = new mx3dgetrsf();\
  wheelaxle\_1\_trsf.setrotation(new mx3dgeaxis(new mx3dgepoint(0, 0, 0), new mx3dgedir(1, 0, 0)), math.pi / 2);\
  carlabel.addcomponent(wheelaxlelabel, new mx3dgelocation(wheelaxle\_1\_trsf)); // 添加第一个轮轴装配体,有位置(绕x轴旋转90度之后的位置)\
  let wheelaxle\_2\_trsf = new mx3dgetrsf();\
  wheelaxle\_2\_trsf.settranslationpart(new mx3dgevec(100, 0, 0));\
  wheelaxle\_2\_trsf = wheelaxle\_2\_trsf.multiplied(wheelaxle\_1\_trsf); // 矩阵相乘,得到第二个轮轴装配体的位置,相乘后的矩阵代表先绕x轴旋转90度,然后再向x轴正方形平移100\
  carlabel.addcomponent(wheelaxlelabel, new mx3dgelocation(wheelaxle\_2\_trsf)); // 添加第二个轮轴装配体,有位置(绕x轴旋转90度,然后再向x轴正方形平移100之后的位置)\
  carlabel.addcomponent(bodylabel, new mx3dgelocation(wheelaxle\_1\_trsf)); // 添加车体,有位置(绕x轴旋转90度之后的位置)\
  // 更新新图显示模型,会将文档中的模型显示到当前视图中\
  mxcad3d.update();\
}\
// 给button添加点击事件,点击后调用drawassemblycar函数\
// 立即执行函数\
(function addeventtobutton(){\
  const btn = document.queryselector("button");\
  if (btn) {\
    btn.addeventlistener("click", () => {\
      drawassemblycar();\
    });\
  }\
})()
按照官方快速入门教程,新建终端,运行npx vite命令来运行项目,观察效果如下图: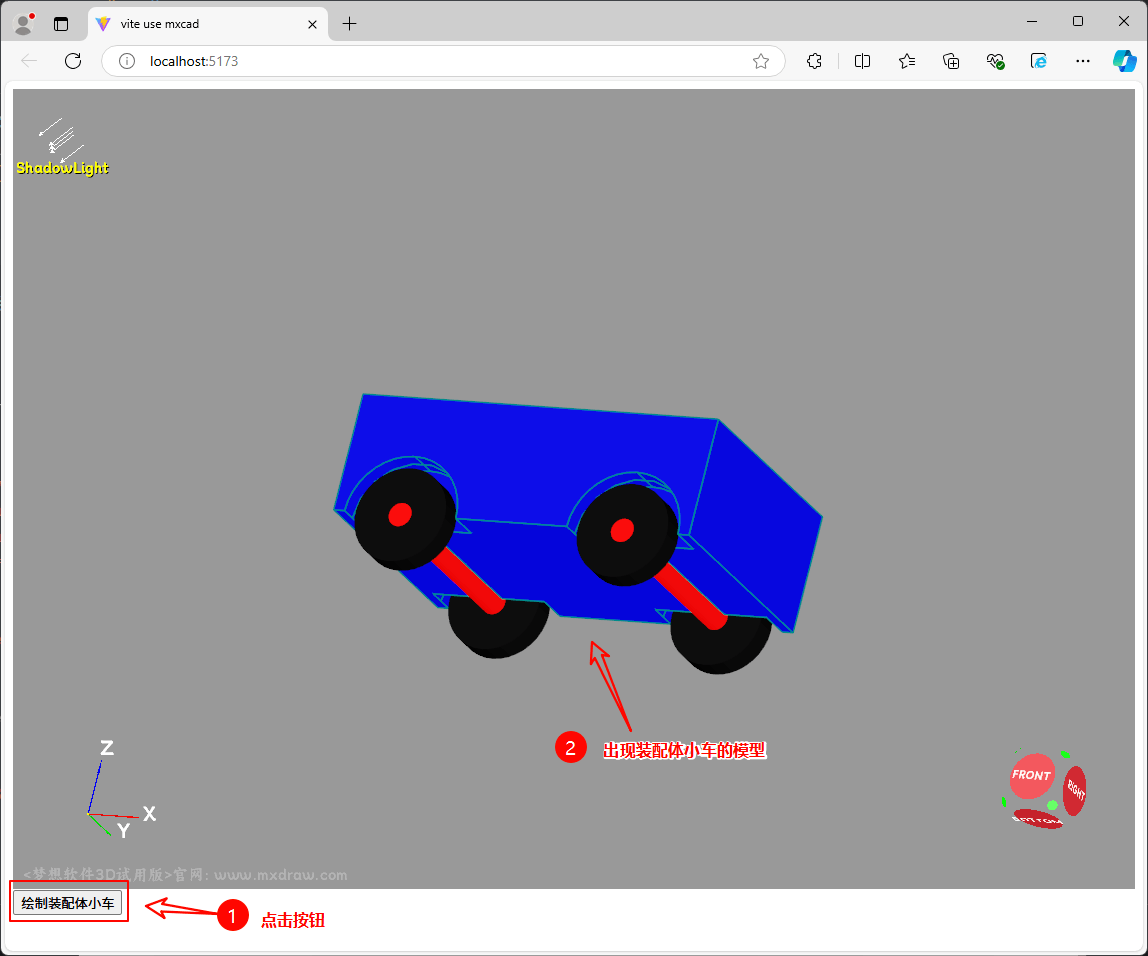
本作品采用《cc 协议》,转载必须注明作者和本文链接